For the longest time, I’ve wanted to try my hand at building a cyclic carousel that can constantly loop through a list of images.
I’ve seen variations that are simpler to implement:
- Static carousel: In the case that your carousel doesn’t require a sliding effect, you can simply replace the
srcandaltattributes in the displayed<img>. - Linear carousel: In the case that your carousel does require a sliding effect but doesn’t need to loop through the images multiple times, you can generate a row of
<img>tags and contain them with anoverflow: hiddenwrapper. With a couple oftransforms andtransitions, you’ll be able to shift these images smoothly.
Here’s an example of a linear carousel:

Once the user reaches the first or last image in the list, they no longer have the option of proceeding further.
Cyclicity
The actual behaviour we’re interested in is this:

When the user reaches the last image, they would still have the option of tapping “Next” to return to the first image.
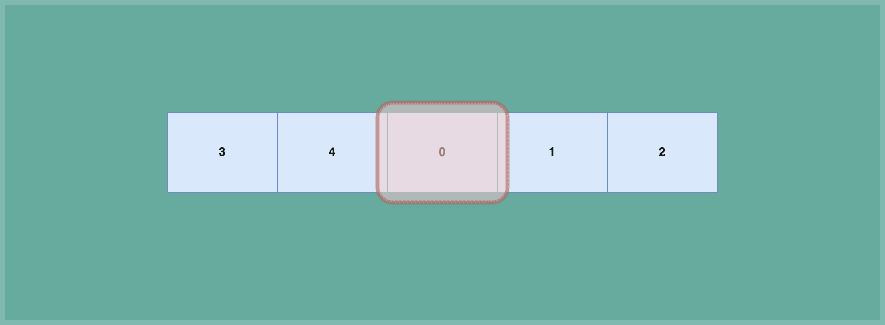
To implement a cyclic carousel, we’ll rotate our list of images such that the first image becomes the middle image. We’ll also transform the list of images so that the (original) first image remains the displayed image:
const imagesFragment = document.createDocumentFragment();

// Rotation
for (let i = halfLength + 1; i < sources.length; i++) {
  imagesFragment.append(createImageNode(sources[i]));
}
for (let i = 0; i <= halfLength; i++) {
  imagesFragment.append(createImageNode(sources[i]));
}

imagesNode.append(imagesFragment);
imagesNode.style.transform = `translateX(${translationValue}px)`;
Second, when the next button is tapped, we’ll simply invoke a transitioned transform on the list of images (as we’d also do for linear carousels).
imagesNode.style.transform = `translateX(${translationValue}px)`;
imagesNode.style.transition = "transform 1s";
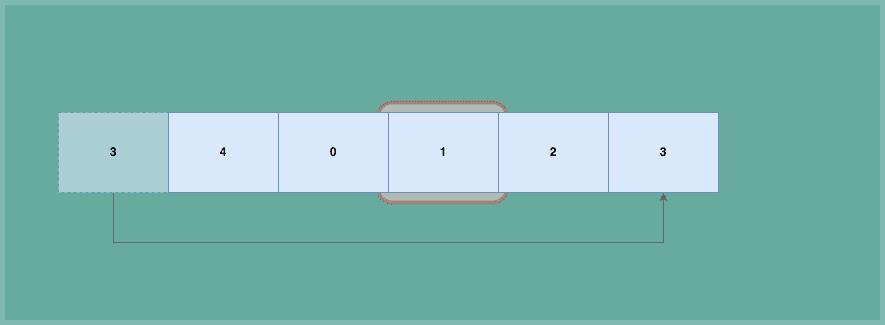
Finally, once the transition has ended, we’ll need to apply two changes to the next rendered frame:
- We’ll remove the leftmost image and append it to the end of the list
- We’ll adjust our transform value (without any transitions) to account for the image that we’ll be removing
To watch for the end of a transition, we’ll rely on the transitionend event.
imagesNode.addEventListener("transitionend", () => {
  requestAnimationFrame(() => {
    if (lastDirection === "right") {
      const head = imagesNode.firstChild;
      imagesNode.removeChild(head);
      imagesNode.append(head);
      index -= 1; // `index` determines the translation value
    } else if (lastDirection === "left") {
      const tail = imagesNode.lastChild;
      imagesNode.removeChild(tail);
      imagesNode.prepend(tail);
      index += 1;
    }
    imagesNode.style.transform =
      `translateX(${index * -shiftUnit}px)`;
    imagesNode.style.transition = "";
  });
});
It’s important that we execute both operations –– failing to re-calibrate the translation value after removing the leftmost image will make the subsequent image visible to the user (i.e. image 2 instead of image 1).
Concluding Thoughts
If you’d like to see an example of JavaScript and CSS coming together to make this work, check out this sandbox I’ve created.
To be clear, I’m not entirely sure if this is the best way to achieve a cyclic carousel. For instance, you don’t necessarily have rotate your list of images such that the first image sits in the middle from the get-go. You can always wait until your display approaches a boundary (either the head or the tail of the list) before running a bulk remove-and-append / remove-and-prepend operation.
In any case, I hope this is useful for anyone who’s looking for a working solution that’s relatively easy to implement!